I baby wear. There I said it, I wear Shane in a soft structured carrier (SSC) and he loves it. I always knew that I would baby wear. I don't know when I decided that I would. I'm guessing sometime around college when I would see mom's carrying their kids in woven wraps and ring slings. When I was pregnant, Jarrod asked me "Are you going to get one of those Davis mom baby holders"? I love the feeling of having Shane close and getting the extra snuggle time. He is so happy when we are out shopping and he can look around at all the action. It's also nice to have an alternative to carrying him in my arms or having to lug the stroller around. I get so many compliments when I'm out and about. I know some of my fellow moms aren't so lucky to live in areas where baby wearing is as widely accepted as it is here in Northern California. Be proud and keep wearing your babies. And I promise if I see you in Target, I will "TITW" you.

Other bit of information about Shane. He's part beaver (see above). This kid eats everything, well he bites everything. Not like in a mean way, he just takes a little nibble out of whatever he can. A few months back he had this funny little look on his face and his lips were pursed. When he opened his mouth, there were little bits of the padding of his crib rail. Which is funny considering that for actual food, he's got his special diet. When this kid is being worn, those should straps don't stand a chance. But what could I do to avoid having the straps of my Tula getting all nasty? I needed some drool pads ASAP. I bought a very cute pair when Shane was exhibiting his first signs of beaver-syndrome. They've lasted well, but I only had one pair. And with all the cute prints of Tulas out there, mama needs some coordinated accessories.
After staring at my original pair of drool pads, I started to think "I might have enough sewing skill to make these myself". So I set down, trusty iPad on my lap and did some research. The Internet is flush with many different tutorials (like here, or here, or here) of how to make drool pads, so I studied a few and got to work.
I hope you enjoy my tutorial on making drool pads and make yourself or a friend a pair. I'd love to see what you all come up with.

Materials:
- Fabric of your choice (or two if you'd like them to be reversible) cut to 10 in x 7in. For a set of pads you will need 4 separate 10"x7" pieces
- Absorbent fabric (terry cloth, cotton, flannel, microfiber) also cut to 10"x7"
- KAM (or similar) snaps or Velcro
Directions:

Cut fabric to 7"x10" inches. I created a cardboard template to ensure that I had Mickey's in the center of my chew pads.

Fabric pattern prior to cutting. I decided that I wanted each pad to have two Mickey's centered.

Cut two pieces (one for the front and another for the back). I made it hard on myself and cut each piece individually. If I had planned better I would have cut the width of fabric (7 inches) and then the length (10 inches). Oh well, next time. That's the great thing about making something. You can find new and creative ways to make something work for yourself. I've never taken a formal sewing class. Everything I know I've learned from YouTube, blogs, friends and family.

Cut a 7"x10" piece of absorbent material for the lining. I used a cotton knit.

Create a "sandwich" of your 2 print fabrics (right sides facing each other) and lay your middle layer fabric on top. Pin all the layers together. I'm not fancy enough to do ribbons, but this would be the step where you would add ribbon. For more details on how to add loops or ribbons, click here.

Using a 1/4 seam allowance, sew around the edges of your sandwich.

Be sure to leave a section roughly 1-2 inches open so that you are able to turn your work right side out. Trim the corners off the edges of your work. Be sure not to get too excited and cut through the stitching. Trimming your corners will allow for more crisp edges when your piece is finished.
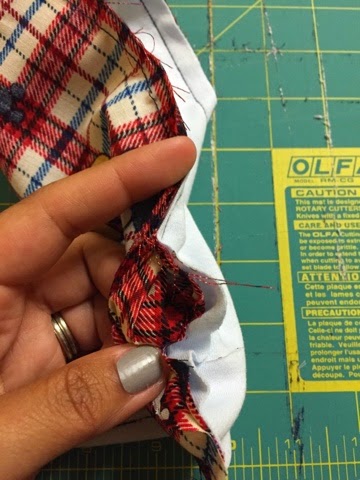
Moment of truth. Time to turn your work right side out. To get those crisp corners, I take a chopstick and go around my inside seams and make sure the corners are fully pushed out.

Whew, all the pieces were facing the right directions. Time to sew up the gap and add some decorative stitching.

For this particular fabric I thought a navy zigzag would look nice. Be wild and crazy and use a fun stitch. It'll be ok, I promise. My sewing machine came with a bunch of fun stitches. It would be a shame not to use them.

Time to add some snaps. Or Velcro. Or buttons. These are your drool pads so use whatever you'd like. I like the look of snaps, so I use snaps. Snap pliers are fun. I think everyone needs a pair. Plus, the sound of Velcro ripping is like nails on a chalkboard to me. I will use 3 sets of snaps for these pads. I eyeballed where I'd like to have the snaps. If you're super particular you can measure and punch. Just be sure to align the snaps correctly with one side being the cap and the other being the socket/stud piece.

All done. Snaps are in the right places Socket on the left side, cap on the right. This will also allow for my pads to be reversible.

Repeat steps to complete your second drool pad. Make up a pair or two and dress up your favorite baby carrier. These would also be a great baby shower gift.
Happy sewing.
Awesome tutorial Drea!!! I love the Mickey fabric and it seems like an easy process. You're wearing me down on the snap pliers... I might want some. I'm going to have to try yours at some point. They look fun! :)
ReplyDelete